How I fixed my audio levels, tackled Final Cut Pro export codecs, and cracked YouTube’s loudness normalization.
Have you ever played back one of your own YouTube uploads, turned up the volume, and thought, "Why does this sound so much quieter than everything else on the platform?"
That exact moment hit me recently while listening back to some of my videos. Given that my channel is named AfterAudio (it literally has "audio" in the name!), I knew I couldn’t just let it slide—I had to figure out why and fix it.
That realization sent me down a deep dive into audio measurement, export parameters, and YouTube's internal processing. I ended up testing out multiple files and even replaced the live public video a few times while dialing things in. Hopefully no one noticed, but if you caught a video disappearing and reappearing—now you know why!
Hurdle 1: Final Cut Pro Export Settings & Audio Codecs
My first hurdle was finding an export setting in Final Cut Pro that balanced video resolution, pristine sound quality, and reasonable file size.
My goal was to use HEVC 10-Bit to keep video file sizes manageable without sacrificing visual fidelity. However, when working with video formats, your audio codec choice usually comes down to AAC vs. Uncompressed Audio (PCM/LPCM):
- Uncompressed Audio (PCM/LPCM): Offers lossless studio quality, but it creates huge file sizes. More importantly, uncompressed audio is actually not available when exporting directly to HEVC 10-Bit in Final Cut Pro.
- AAC (Advanced Audio Coding): YouTube's official recommendation. It gives you crisp sound while drastically reducing overall file size.
To get around Final Cut Pro's built-in limitations and get the best of both worlds, I created a custom destination preset using Apple Compressor. This allows me to render in HEVC 10-Bit with AAC 320 kbps (the highest quality AAC bitrate available). It keeps the file size tight while feeding YouTube the cleanest possible compressed master.
My current baseline video export settings:
- Video/Audio Encoding: HEVC 10-Bit + AAC 320 kbps (via custom Apple Compressor preset)
- Resolution & Frame Rate: Match Source Footage
Hurdle 2: Target -14 LUFS (Why Quiet Audio Stays Quiet)
Once my export settings were locked in, I had to tackle loudness. YouTube uses an automated algorithm targeting an integrated loudness of roughly -14 LUFS (Loudness Units Full Scale).
Here is the critical lesson I learned about how YouTube handles audio:
YouTube will normalize and turn down audio that is louder than -14 LUFS, but it will NOT turn up audio that is quieter than -14 LUFS.
Audio sitting above -14 LUFS is totally fine because YouTube's normalization engine simply turns it down to meet the standard. However, if your mix is too quiet, YouTube leaves it untouched, forcing your viewers to crank up their device speakers manually.
What About True Peaks?
While YouTube turns down audio above -14 LUFS safely, you still need to watch out for frequent and sustained True Peaks. If your raw audio clips or hits digital 0 dBFS constantly, it will cause harsh inter-sample distortion during YouTube's transcode process. To prevent this, setting a true peak limiter to -1.0 dB True Peak max gives you a safe buffer.
Decoding YouTube's "Stats for Nerds"
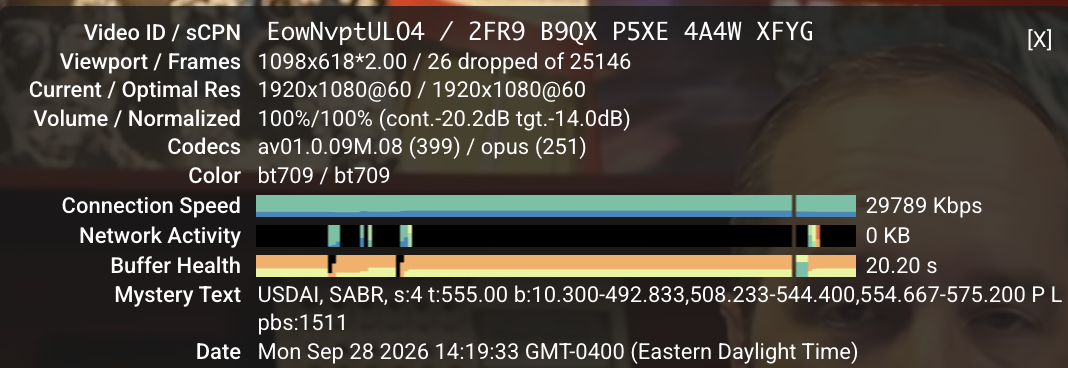
You can check how YouTube is treating your audio on any video by right-clicking the player and selecting Stats for nerds. Pay close attention to the line labeled Volume / Normalized.
Before: The Quiet Mix
Here is an example from one of my recent videos before fixing my workflow. The readout showed:
100% / 100% (content gain -20.2dB tgt -14.0dB)
After: Ozone Maximizer & True Peak Limiting
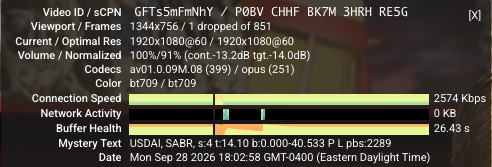
To fix this, I pulled the audio into my chain and used iZotope Ozone Maximizer to boost the overall volume to hit -14 LUFS while setting a hard limiter to -1 dB True Peak. This prevented any clipping or inter-sample peak issues while bringing the mix up to full platform loudness.
Quick Action Plan for Clean YouTube Audio
Here is the roadmap to make sure your uploads sound clear, loud, and competitive:
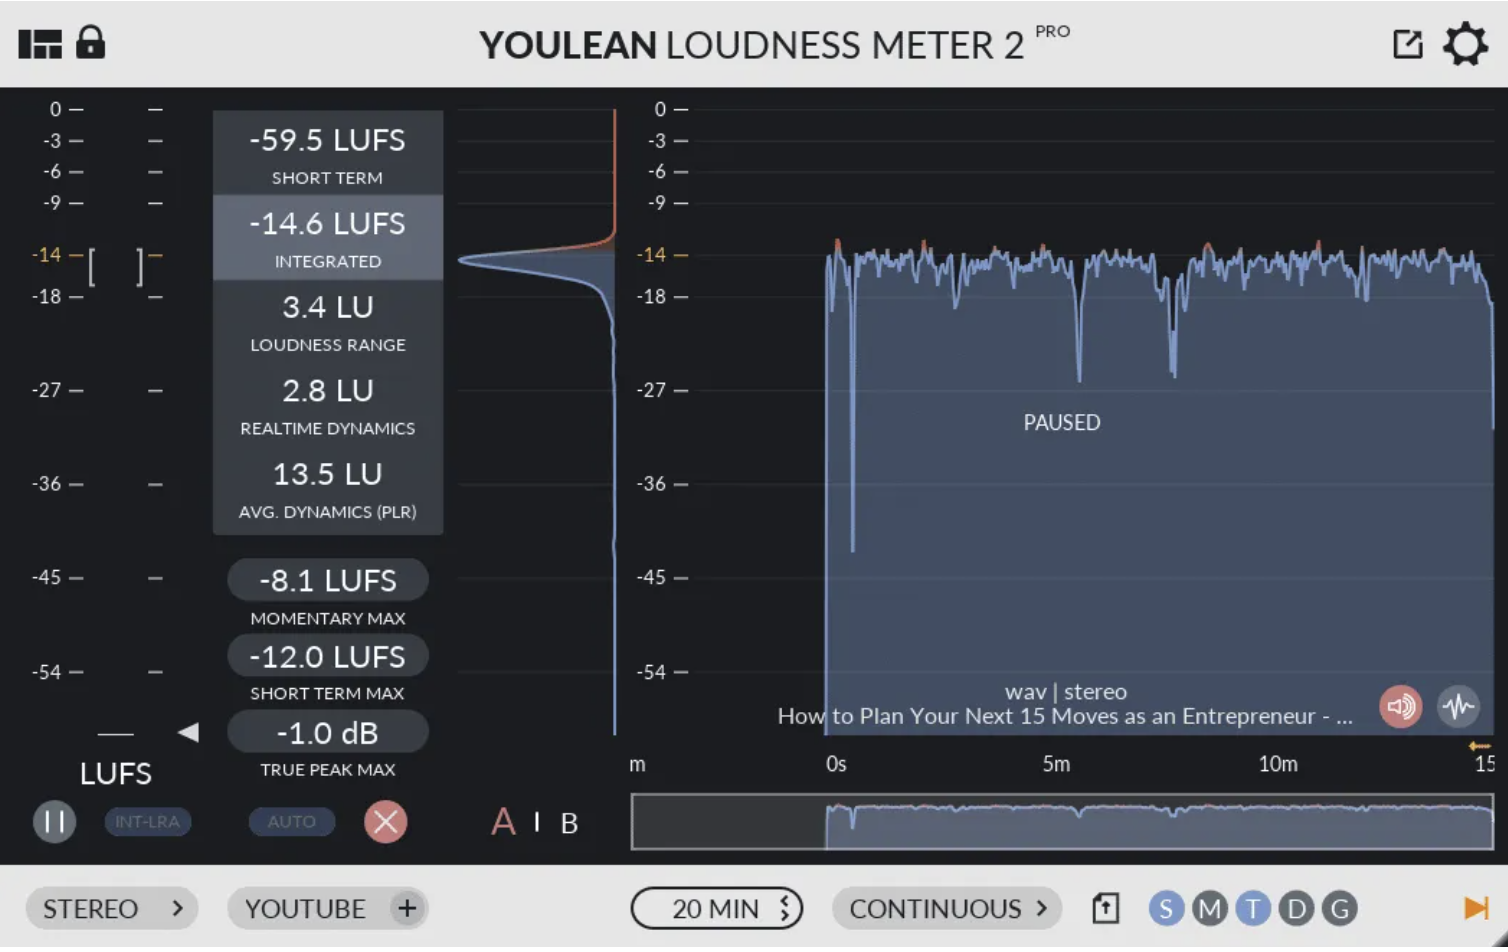
- Use a Visual Loudness Meter: Load up a real-time meter (like the free Youlean Loudness Meter) on your master bus to track Integrated LUFS and True Peaks.
- Maintain Level Consistency: Keep your spoken voice, intro/outro music, and sound effects balanced relative to each other throughout the edit.
- Compress When Necessary: Gentle vocal compression smooths out the dynamics so quiet words aren't lost and loud shouts don't overwhelm.
- Limit True Peaks to -1 dB: Use a limiter with true peak detection set to -1.0 dB max to prevent inter-sample clipping during compression/transcoding.
-
Aim for -14 LUFS or Higher: Make sure your integrated loudness reaches at least -14 LUFS so YouTube doesn't leave your video sounding quiet.
Summary & Looking Ahead
Audio is a constant journey of learning and trying out new techniques. Digging into export codecs, compression limits, and LUFS standards taught me a ton that I'm directly applying to future YouTube videos and streaming setups. The goal is simple: create the absolute best audio and overall experience for anyone tuning in.
Useful Resources & Recommended Reading
- Youlean: How to Edit Video for Good Audio Loudness on YouTube – Clear overview on using meters, limiters, and gain structure for YouTube.
- YouTube Audio & Video Recommended Upload Settings – Official specs on recommended bitrates, sample rates, and audio codecs.
- Apple Support: Final Cut Pro Export Destinations – Official guide on setting up custom export destinations and Compressor integration.
- Pure Audio Insight: Perfect YouTube Audio Levels – A technical guide to understanding dynamic range and streaming normalization.
- AES TD1008 Technical Document – Guidelines for audio loudness in video streaming and OTT content.