After stepping away from the computer to clear my head from my first round of troubleshooting, I decided to wipe the slate clean and start over from scratch. Instead of trying to patch broken files, I took everything I learned from those earlier headaches, went back to the TONE3000 capture page, downloaded a fresh signal sweep file (T3K-sweep-v3.wav), and built a new workflow in REAPER.
The result? Two clean captures of my Yamaha VA-2, one clean channel and one drive channel, that came back with ultra-low error ratings and sound remarkably close to the real amp. Here is the exact step-by-step setup that got me across the finish line.
1. Locking Down REAPER Audio Preferences
The biggest lesson from round one was that Neural Amp Modeler (NAM) is completely unforgiving about sample rates and clock sync. TONE3000 requires captures to be mono, 24-bit, 48 kHz WAV files—if your DAW resamples on the fly, sample counts shift and training fails.
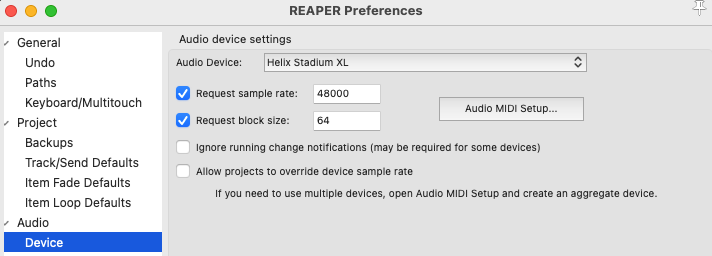
In REAPER, I went straight to Preferences > Audio > Device and configured the following:
- Audio Device: Selected the Helix Stadium XL.
-
Request sample rate: Checked and locked to
48000Hz (with a block size of64). - Allow projects to override device sample rate: Left unchecked so nothing could accidentally knock the interface out of 48 kHz.
2. Hardware & DAW Routing (Using the Helix Stadium XL as a Reamp Box)
Because I don't own a standalone reamp box, I routed the Helix Stadium XL to handle both sending the sweep signal to the amp and returning the mic signal back to REAPER. To keep everything strictly mono as TONE3000 requires, I made sure to hard-pan any stereo inputs/outputs on the Helix paths down to a single mono channel.
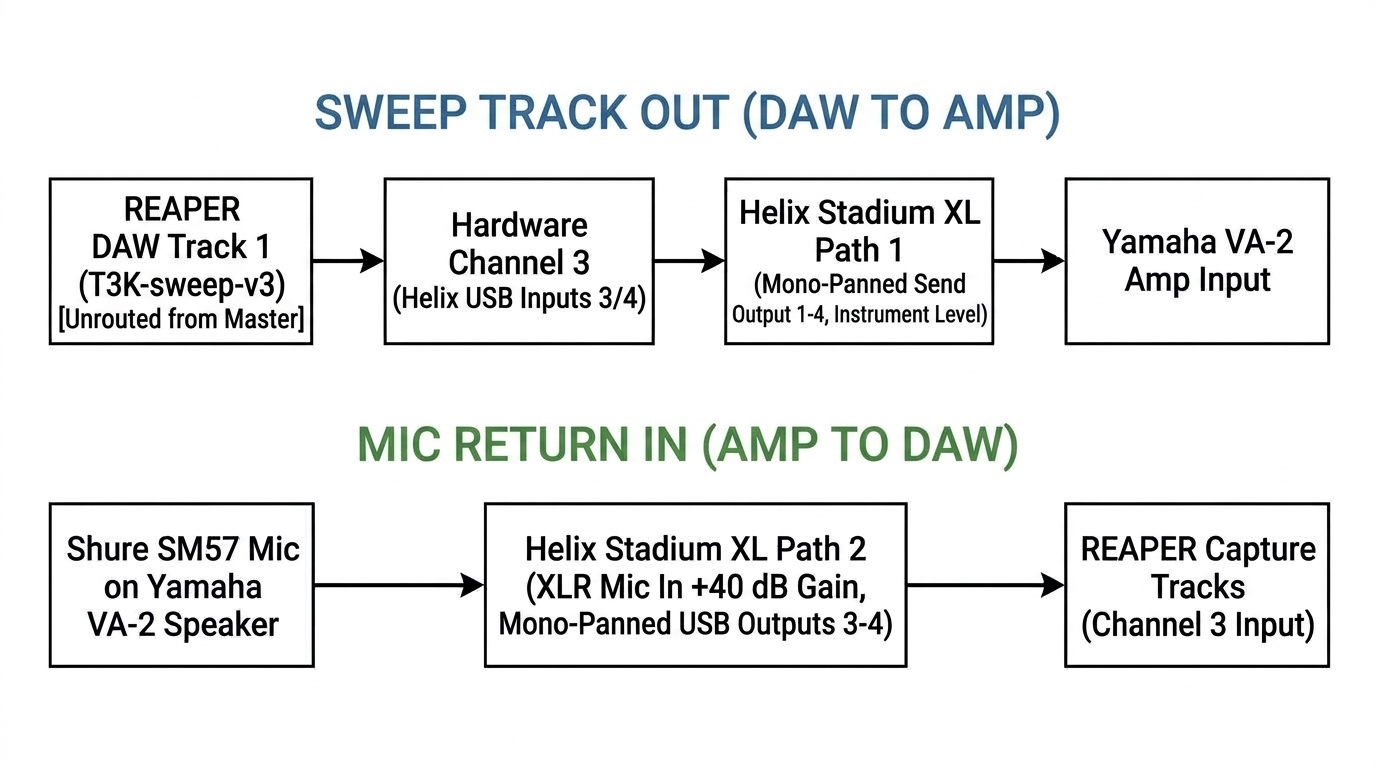
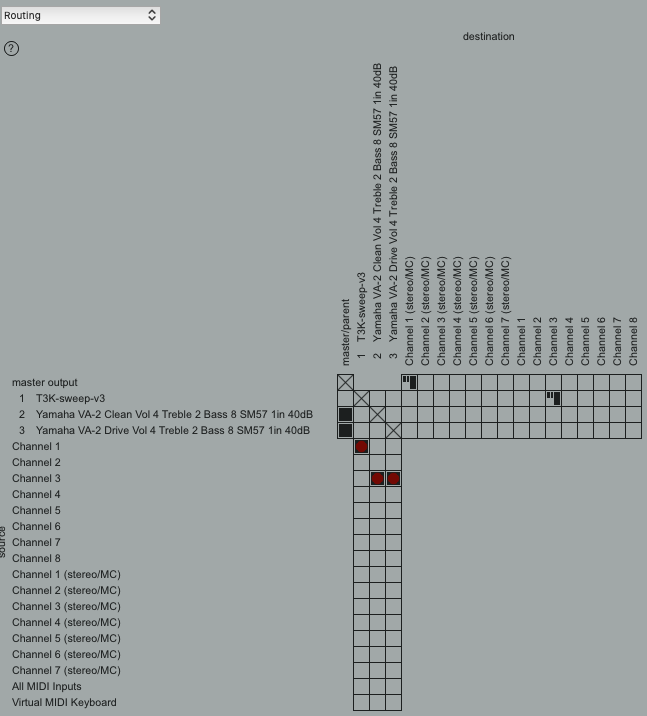
Here is how the signal chain flowed through REAPER's routing matrix and the Helix Stadium XL:
-
Sweep Track Out (DAW to Amp): Track 1 (
T3K-sweep-v3) was unrouted from the master parent send and routed directly to hardware Channel 3 (Helix USB Inputs 3/4). Inside the Helix, Path 1 took that USB feed and routed it out of a mono-panned Send output (1–4) set to instrument level straight into the Yamaha VA-2. - Mic Return In (Amp to DAW): Path 2 on the Helix took the XLR microphone input (with +40 dB of mic gain) and routed it to USB Outputs 3-4 (mono panned), which fed directly into Channel 3 on my capture tracks in REAPER.
3. Swapping the Mic to Cut Room Noise
One of my biggest problems in Part 1 was a high noise floor. Originally, I was using a Behringer ECM8000 reference mic. While great for measuring acoustic spaces, the ECM8000 is omnidirectional—meaning it picks up sound equally from every direction in the room, including ambient hum and reflections.
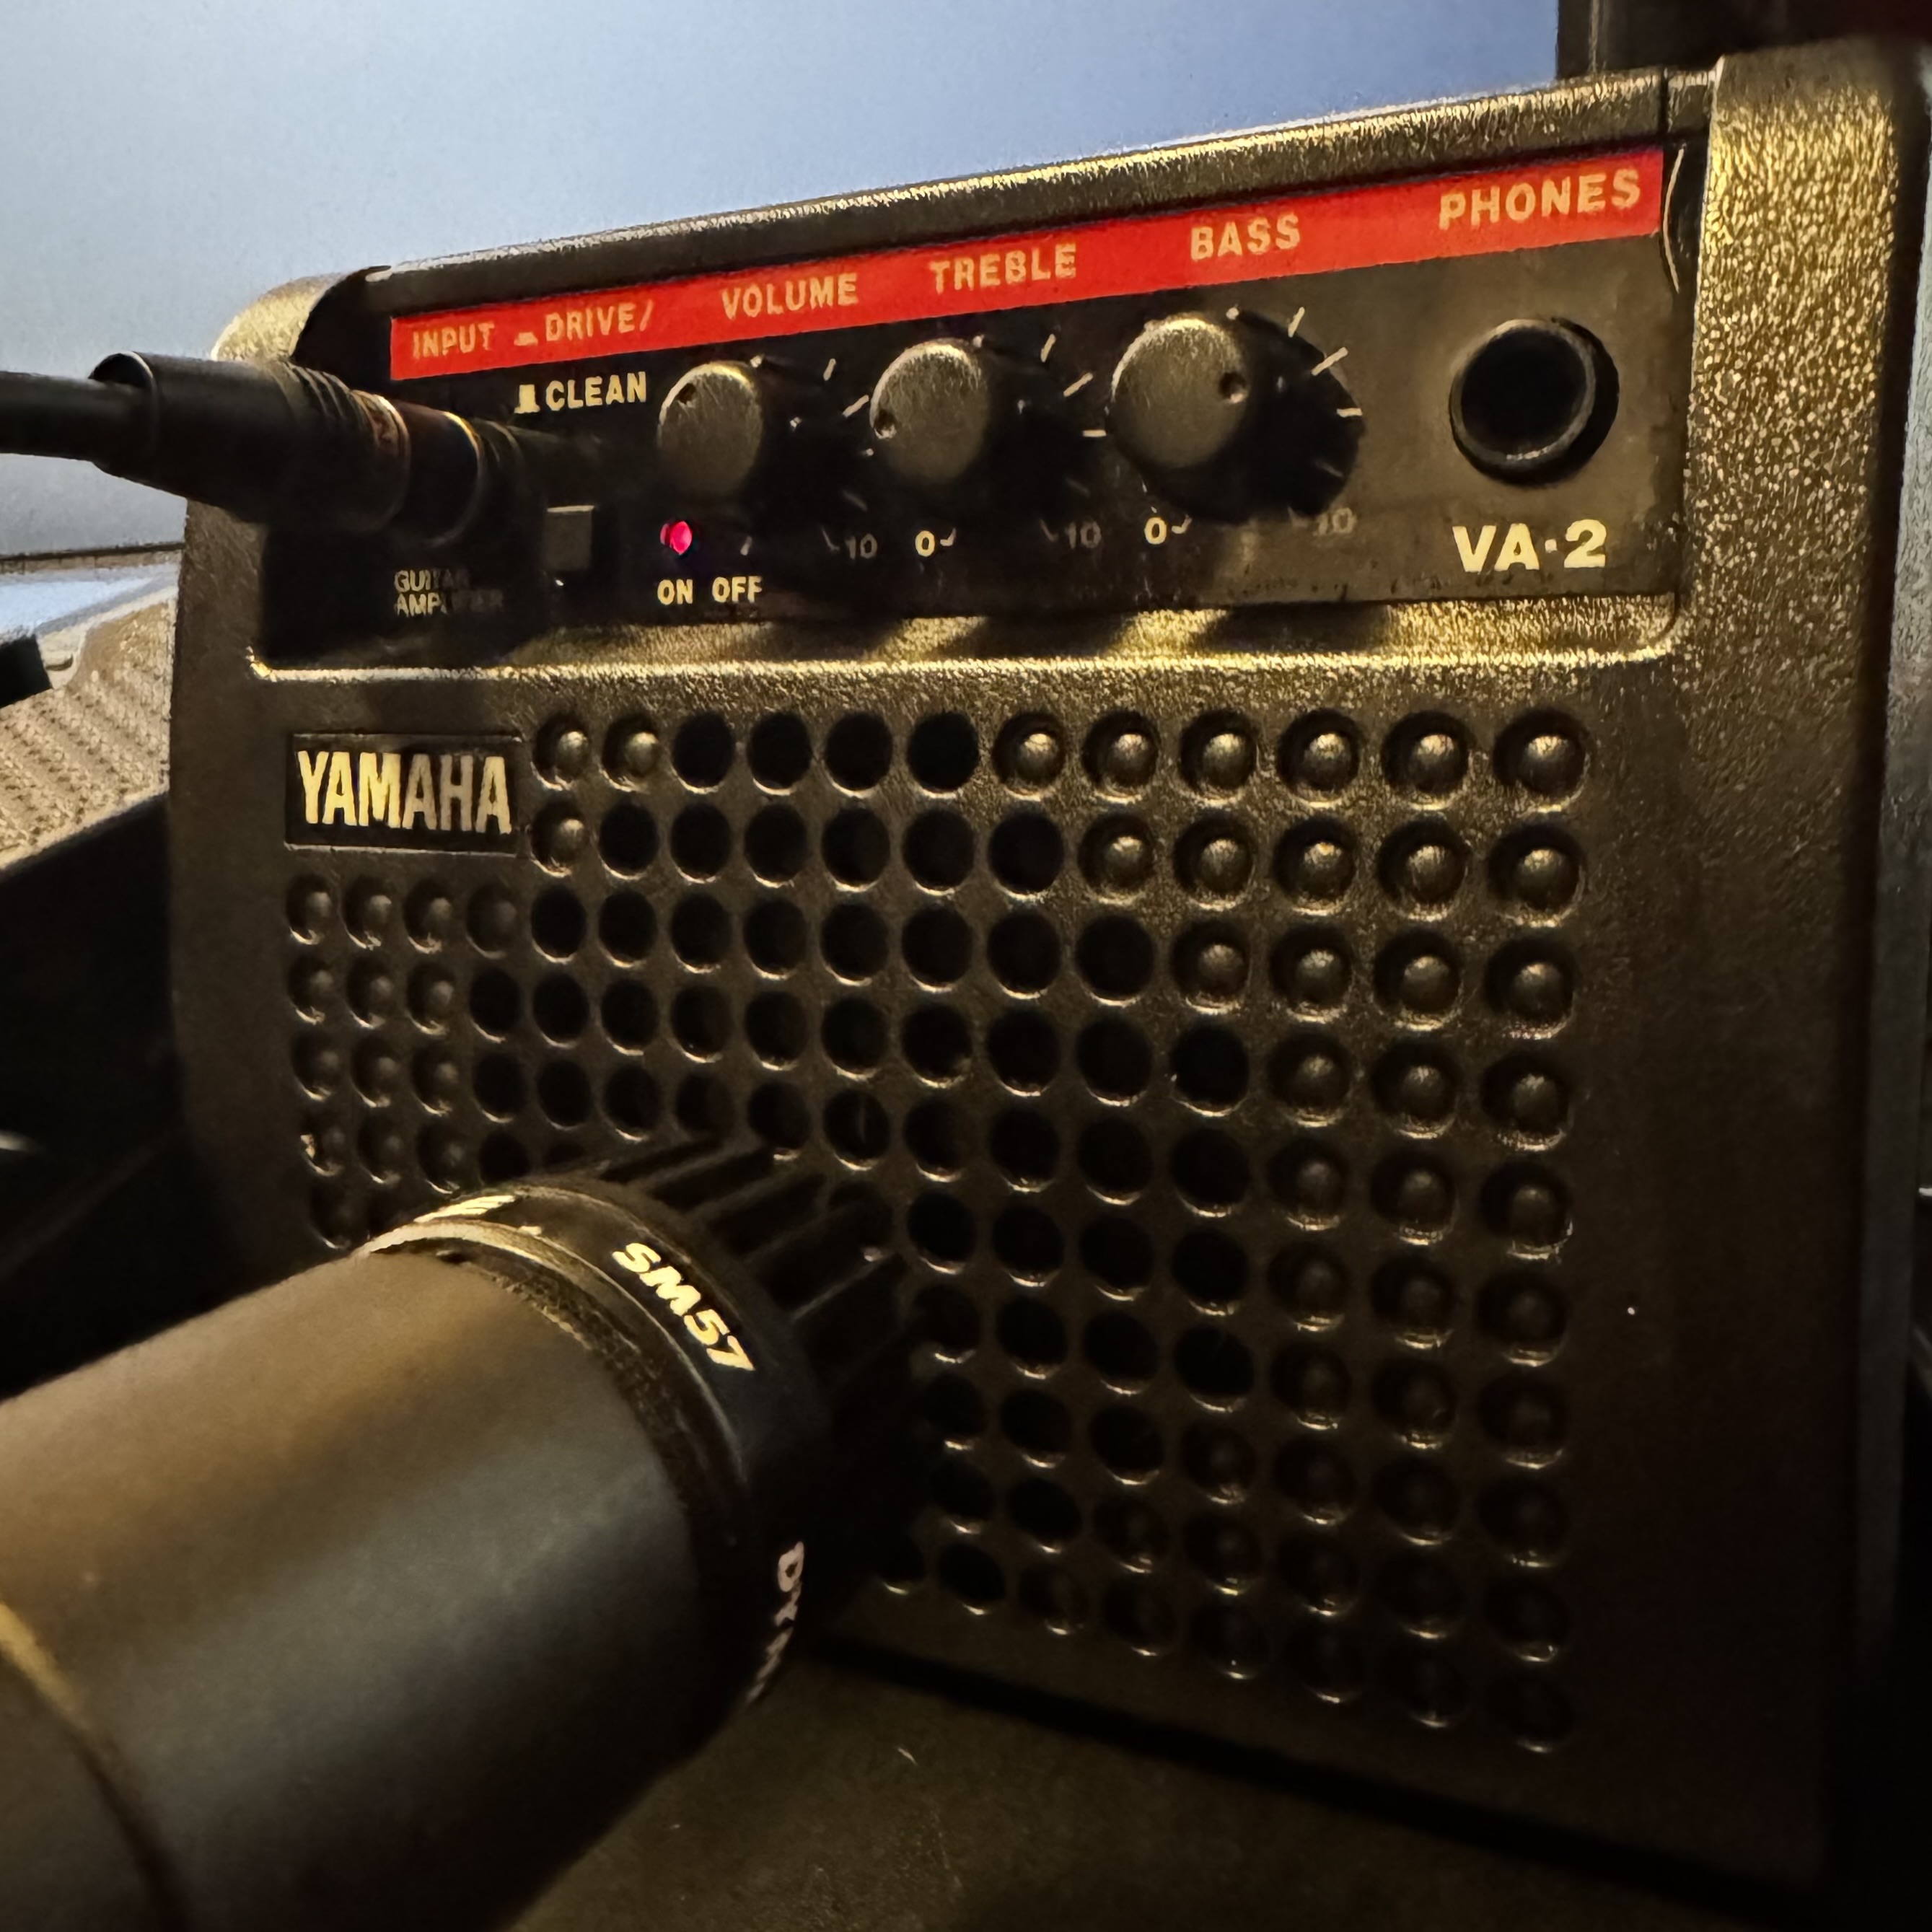
I swapped it out for a classic Shure SM57 placed 1 inch off the speaker grille. Because the SM57 uses a cardioid (heart-shaped) polar pattern, it focuses strictly on what is directly in front of the capsule while rejecting room noise from the sides and rear. That single hardware swap cleaned up my signal-to-noise ratio immediately.
4. Sample-Accurate Recording with Auto-Punch
TONE3000 checks the length of your uploaded WAV file against the original sweep file down to the exact sample. Even a millisecond of extra silence at the start or end will throw an upload error or ruin the alignment.
To guarantee an exact match every single time:
- I snapped the original
T3K-sweep-v3.wavitem to the start of the timeline and set REAPER's Time Selection to match the exact boundaries of that file (3:10.000). - I set REAPER's Record Mode to Time Selection Auto-Punch.
- I armed my capture track and hit record—REAPER automatically punched in at sample zero and punched out at the exact end of the sweep file.

5. Exporting with Consolidate Tracks
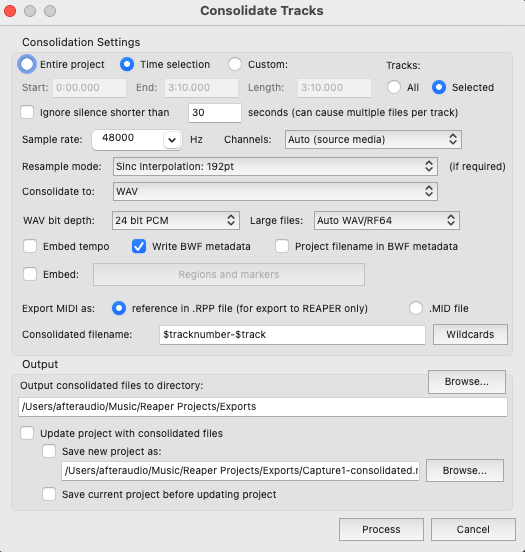
Once the sweeps were recorded, I avoided standard project renders that might append tail silence and instead used REAPER's Consolidate Tracks dialog with these settings:
- Bounds & Tracks: Set to Time selection and Selected tracks.
-
Sample rate:
48000Hz. -
Channels:
Auto (source media)(or1) to ensure the output stayed strictly mono. -
Format & Bit Depth:
WAVat24 bit PCM.
The Moment of Truth: Understanding ESR
I uploaded the consolidated WAV files to TONE3000, held my breath, and watched the training finish. When the results popped up, I finally let out a massive sigh of relief:
-
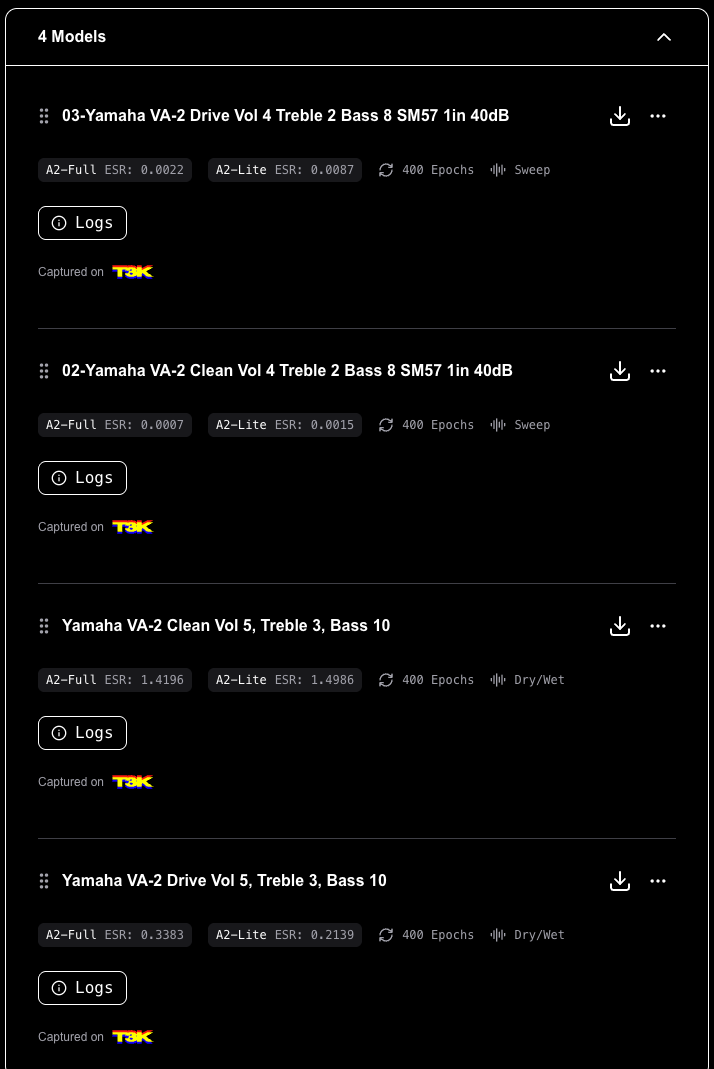
Yamaha VA-2 Clean: A2-Full ESR of
0.0007(A2-Lite:0.0015) -
Yamaha VA-2 Drive: A2-Full ESR of
0.0022(A2-Lite:0.0087)
For anyone new to NAM, ESR stands for Error-Signal Ratio. It is a measurement of how closely the trained neural network model matches your actual gear, sample by sample. Think of it like a golf score—the closer to 0.0000, the better. Anything under 0.01 is generally considered a very accurate capture, so landing at 0.0007 on the clean channel was a huge win after seeing numbers over 1.4 during my failed attempts.
Pre-Capture Checklist: Common Pitfalls to Avoid
If you are planning to make your own captures on TONE3000, run through this quick checklist before hitting record to save yourself hours of troubleshooting:
- Mismatched Sample Rates: Make sure your interface, DAW project, and export settings are all locked to 48 kHz / 24-bit before you import the sweep file.
- Stereo vs. Mono Routing: NAM sweeps must be mono. Double-check that your DAW tracks and interface routing aren't summing a stereo pair or exporting a 2-channel file.
- File Length Drift: Always use time-selection auto-punch or snap your cycle range tightly to the original sweep boundaries so no leading or trailing silence sneaks in.
- Input Clipping: Gain-stage your return signal so peaks sit around -8 dB. Digital clipping during the sweep will ruin the model's harmonic response.
- Room Noise & Ground Loops: Use a directional cardioid mic close to the speaker rather than an omni mic, and engage a ground lift if you hear 60-cycle hum between your interface and amp.
- Time-Based Effects & Moving Knobs: Never leave reverb, delay, or chorus engaged during a capture, and don't touch a single knob on your amp once the sweep starts.
Final Verdict: Line 6 Proxy vs. TONE3000
Having now successfully created captures on both platforms with the exact same amp, the trade-off between them is crystal clear. Line 6 Proxy is unbeatable for pure convenience—everything is self-contained inside the Helix Stadium XL, takes a couple of minutes, and requires zero routing gymnastics.
However, when A/B testing the finished models side by side, the TONE3000 captures had noticeably more detail and felt closer to the real Yamaha VA-2 in the room. You do have to build a disciplined workflow and respect the strict file and routing requirements, but once your DAW template is dialed in, making repeatable captures is smooth.
Overall, this turned out to be a great learning experience. If you own a favorite amp or pedal, I definitely recommend trying to make at least one capture yourself—just follow the checklist above so you spend your time playing instead of reading error logs!
Get the captures HERE